Installation of Concrete Pavers on Steep Slopes
By Interlocking Concrete Pavement Institute

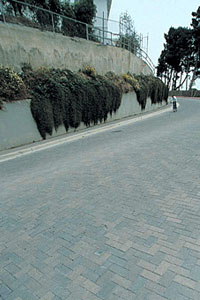
Designers, contractors and homeowners often ask what the maximum slope is for a driveway constructed with concrete pavers. The best example of a steeply sloped project is a street in Colma, Calif., with an 18-percent grade. While there might be driveways and streets with steeper slopes, the Colma project provides the current upper limit in North America at 18 percent (see Figure 1).
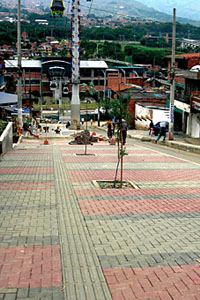
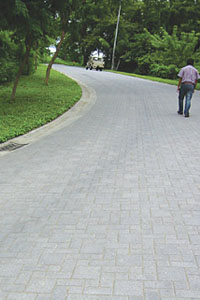
Of course, higher slopes have been achieved. Figure 2 shows a Costa Rican road with a maximum slope of 25 percent that leads to a mountain hotel on the Papagayo Peninsula. Likewise, moving into South America, Figure 3 shows a street and pedestrian walkway with a 14-percent slope just after construction was completed in Medellín, Colombia.
For embankment applications without vehicles, the limiting factors are the angle of repose of the bedding sand, base and soil subgrade and, most importantly, the resistance to soil and base sliding under compaction equipment. The angle of repose can be as steep as 35 degrees, or about 70 percent; however, the tendency of soil and base to slide during compaction will reduce this limit.

Adequate performance of interlocking concrete pavements on slopes greater than 7 percent depends on careful design considerations and proper execution of construction details. Experience with steep sloping streets and embankments next to bridges have demonstrated that stationary edge restraints, consistent and tight paver joints, and herringbone patterns will help create interlock among the units. Another principle influencing design and construction is the need to remove water from the base, bedding sand and surface.
The following are brief explanations of the various elements of which mason contractors providing interlocking concrete pavement services should to be mindful, specifically in sloping applications.

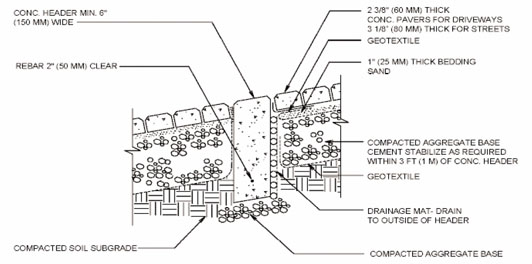
The drainage mat is placed vertically against the concrete header beam located at the base of the pavement. Note the placement with respect to the pavers and bedding sand in the Figure 4 cross section; the top of the mat is covered with a small strip of geotextile to keep sand out.
A drainage mat placed horizontally under the bedding sand should never be used in vehicular applications, including residential driveways.

The compacted base thickness should be at least eight inches (200 mm); however, thicker bases should be built in cold, northern climates. The compacted surface should have a surface tolerance of ±3/8 inch over a 10-foot (±10 mm over a 3 mm) straightedge. Stabilizing three feet (1 m) of base with cement next to the header beam can help prevent base rutting at the header/paver junction. Another approach is to thicken the aggregate base approximately 40 percent over normal thickness to provide extra mass for taking wheel loads. These modifications are especially important when transitioning from a rigid, concrete pavement to an interlocking concrete pavement with a flexible, compacted aggregate base.
Locate the forms so that there is a 1/2-inch (13 mm) gap between the end of the curbs and the header beam. This provides space for the drainage mat to continue the full length of the header beam, allowing water to drain at each side of the driveway or road. The gaps can be covered with geotextile to contain base and bedding sand while still allowing water to drain.
The header beam should be formed, poured and the forms removed prior to placing aggregate base against it. Daylight joints should be placed a minimum of every five feet (1.5 m) to reduce cracking risks — avoid joints made by tooling the beam surface. In addition to controlling cracking, the joints will allow water to drain after any rainfall during construction. After the concrete beam has cured and the forms are removed, (if necessary, excavate) compact the soil and place the drainage mat against the upslope side of the beam.
Since running dump trucks and compaction equipment will damage the curbs, the following sequence should be considered: pour the curbs on the sides of the pavement, compact the soil and base up to the header beam location, pour the header beam, compact the soil, then place and compact base after removal of forms around the cured header. The soil and base along the header beam will require compaction with a hand tamper or small equipment since it is unlikely that equipment will be able to reach corners. This is where the density should be tested.
More importantly, the drainage mat cannot be damaged, soiled or be allowed to fill with base along the edges during compaction. Cover the upslope side and top of the drainage mat to prevent base material from entering. Remove the cover after the base is completely compacted, and it meets density and elevation requirements. Immediately cover the top with geotextile to prevent ingress of base or bedding sand. This is indicated in Figure 4 with a small strip over the top of the drainage mat and anchored by the pavers.
The drainage mat will extend the end of the header and direct water to one or both sides. The area outside the header and curb joints can be filled with No. 57 crushed stone or the equivalent to facilitate drainage of water out of the drainage mat and down slope.
In a few cases, the interlocking concrete pavement may abut an existing concrete slab, such as a driveway apron or an abutting street. Careful consideration should be given on whether to construct a header beam to help direct water away from this slab. Also, care should be taken not to undermine the base and soil under the existing slab during excavation, and later from water working its way through the bedding sand and base. The existing concrete slab should be free of cracks and spalls, especially along the edge that meets the header beam and/or concrete pavers.
If pavers are abutted against a concrete slab, their final surface elevation after compaction should be five to six mm higher than the concrete slab surface.
The pavement surface should have a minimum 2-percent crown or crossfall to direct water to its sides. A crown can increase interlock as the pavers settle slightly from traffic. The cross slope should allow for sheet drainage of runoff to the sides of the pavement. Flush curbs will allow the water to move off the pavement. Once the water is off the curb, consider how water at the sides of the pavement will be transferred down the slope — it may be sent down a grass swale, a rip-rap lined ditch or a concrete gutter. Regardless of the method, the design objective is to maintain sheet flow and prevent channel flow of water over the concrete pavers.
After a second compaction of the pavers on bedding sand, the finish elevation of the pavers should be 1/4 inch (5 — 6 mm) higher than the header beam. This will help prevent water from being trapped against the curbs even if there is minor pavement settlement.
There are two types: liquid applied after the pavers are compacted with joint sand; and those mixed with joint sand and compacted into the joints, then activated with a water spray. Manufacturers' directions should be followed for handling and applying both types of stabilizers.
Stabilizers can reduce the amount of water infiltrating the joints and bedding sand, but they do not render the pavement completely impervious, which is why the design facilitates drainage of the bedding sand. Stabilizers also help to maintain sand in the joints even with exposure to concentrated discharges, such as downspout water, gutter-less eaves dripping water, air conditioning condensation or exterior hose faucets.
These guidelines will require judgment in their application to a specific project and diligent inspection on the job site. Every project will have unique conditions not addressed in this article, and the advice of a design professional experienced in high slope installations should be sought for specific project recommendations.
About the Author
The Interlocking Concrete Pavement Institute (ICPI), founded in 1993, is the North American trade association representing the interlocking concrete paving industry. Learn more at www.icpi.org.
Reprinted with permission. Copyright © 2006, Interlocking Concrete Pavement Magazine, Interlocking Concrete Pavement Institute


