August 8, 2011 7:00 AM CDT
Joseph Cubby says, “Learn the past. Decide the present. Build the future.” With apologies to Cubby, let us examine common below-grade construction moisture management errors from the past that are still in practice, and then make some decisions today on how to correct them so that we can build stronger foundations for tomorrow’s residential and commercial properties. Most residential and commercial structures feature below-grade construction that is usually 10- or 12-inch CMU or eight- or 12-inch poured concrete; a much smaller percentage involve ICF and wood walls.
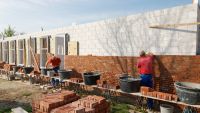
The footings (or caissons) that support these walls can vary in depth and width depending on a variety of soil conditions. The basements may be fully below-grade or partially exposed (a berm) and there may be walkouts; many configurations are possible. However, they all have one thing in common – unique moisture management requirements. (See Image #1.)
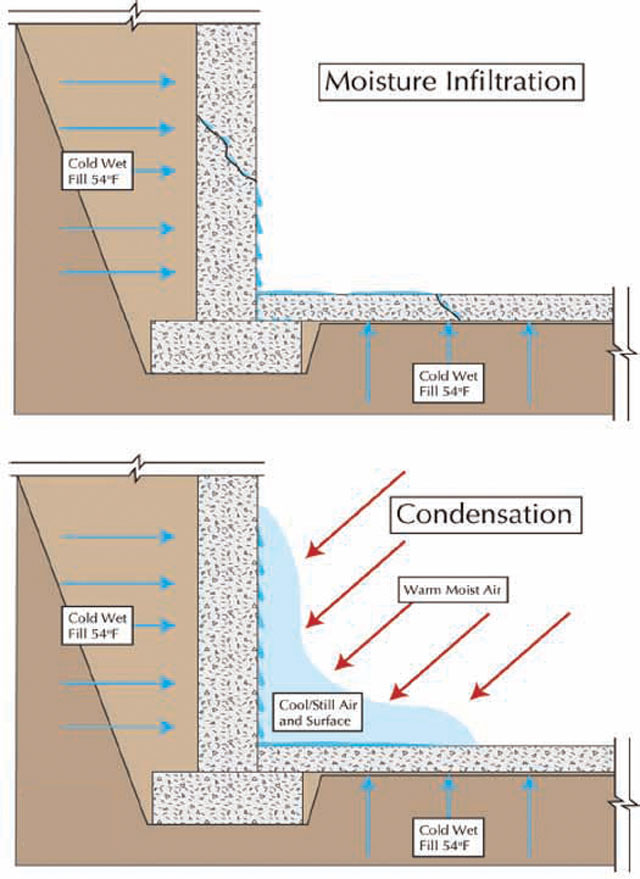
The two most common sources of moisture that impact below-grade construction are infiltrating moisture (in liquid form entering through walls or floors) and condensing moisture (in vapor form being deposited on the interior surfaces of the basement walls and floors to create water droplets). Two very different concepts in the realm of the laws of physics, but in many cases, absolutely connected in the realm of wet and dry basements. The factor that joins them is temperature.
Moisture (water in the fill that surrounds below-grade construction) can impact this construction detail in many ways.
There are two that are most relevant to this discussion. First, moisture can pressurize against the surfaces of below-grade construction and force its way through voids in this construction detail creating “leaks.” Second, moisture, because of its molecular density, can transmit temperatures 25 times more efficiently than air to the exterior surface of the below-grade construction to potentially create a dew point temperature on the interior surface of the below-grade construction creating the possibility of condensation. (See Image #2.)
It’s back to the old rules of moisture management: Keep moisture away from and off of construction details, and get it out of construction details as quickly as possible. If these two rules are adhered to, there will be less risk of moisture damage to the construction detail.
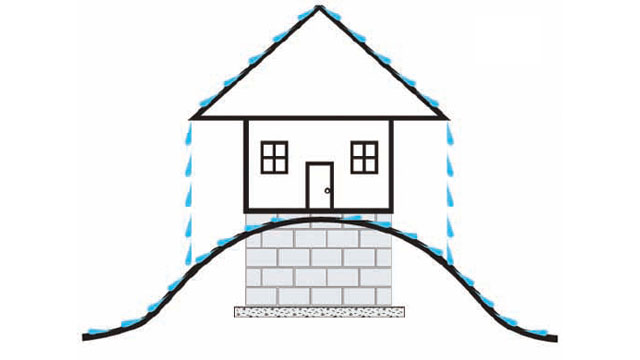
A dry basement begins with a building site that can be managed to control moisture. The familiar phrase “high and dry” comes to mind when planning a foundation. In the nautical world, high and dry is a bad thing, but in the world of below-grade construction, it’s the pinnacle of moisture management perfection. When you get to start with a high-quality building site like the one above, a wet basement isn’t very likely! (See Image #3.)
However, do not let looks deceive you. Once you have found an exceptional building site, be sure that the purchase agreement contains a contingency for a soils report generated by a licensed soils engineer. The information used to create this type of report comes from borings – cores of soil taken at varying depths in prescribed locations on the building site. Taking ownership of a building site that can’t be built on is a bad start. Finding out from the excavator that the soil conditions are bad and will require soil reconstruction and/or budget-busting oversized footings or pilings to support your structure, is also a bad start.
The soils report should also contain information such as the water table and the presence of any potential chemical contaminants. If there is any question about adjoining lots that may leech in contaminants, they should be tested, too. The structural engineer will take the information from the soils report and design the appropriate structural footing and walls that form the basement and support the structure. Once the site has met the critical tests, the next step in the process is jobsite moisture management during construction.
The below-grade construction phase of many building sites is negatively impacted by poor or nonexistent jobsite moisture management plans. A jobsite that is allowed to turn into a mud hole will have long-term negative impact on the soils that surround the below-grade construction and as a result, have a potentially negative impact on the moisture management of the below-grade construction. Jobsite moisture management, in the form of a jobsite drainage plan and the ongoing implementation of this plan, is critical. Allowing jobsite surface water to run toward and into below-grade construction excavation and details can have a permanent negative impact on project. The inadvertent saturation of soils that surround and support footings and walls is not good. (See Images #4A and #4B.)
The list of potential violators of a jobsite drainage plan is long and includes plumbers, sewer and water utility personnel, and electrical contractors. The standing jobsite rule on this should be that anyone who moves or adds fill to a jobsite should return it to the original jobsite elevation drawings and plans and compact fill as to the specs.
Construction specifications should clearly state excavation dimensions required to safely and efficiently construct the below-grade structure and minimize the size of open excavation, therefore, minimizing the amount of water entering the excavation. (See Image #5.)
Upon completion of the excavation, form and pour the footings and walls, or form and pour the footings and lay the block. There are two critical principals that must be followed at this stage of the construction process. Firstly, “Do not fool around!” It is imperative that all parties involved adhere to a strict timeline and complete the project on schedule. The amount of excess time this excavation is left open invites moisture management disasters in the form of excavation cave-ins, flooded excavation, etc. Construct the basement and get it waterproofed, drained, and backfilled ASAP!
Secondly, “Don’t take shortcuts!” Do not skip any of the important construction procedures. The foundation of the entire project is literally being fabricated.
If any part of it is either hurried or omitted, the entire project is at risk. Working cohesively as a team is crucial. There are usually several subcontractors involved including plumbers, electricians, waterproofers and excavators. The coordination necessary to keep these subcontractors on schedule is also crucial.
Additionally, there is a real danger at this time that one or more subcontractors will, because of gross negligence, ignorance or other reasons, undo important drainage or waterproofing details. Studies have shown that as much as 85 percent of all labor time conducted on or near waterproofing systems is conducted by labor that has no understanding of how these systems are supposed to function.
Note: A structural engineer should do the required engineering to facilitate this detail. Connecting the exterior drain tile to the interior drain tile serves two important purposes. First, it provides a drainage pathway for water in an exterior drain tile of a full in-ground basement to have access to the sump pump and sump basket located in the interior of the basement. This facilitates it being pumped out and away from the basement detail. Second, it provides immediate elimination of potential water pressure build up. Prevention of this phenomenon is a must in maintaining a below-grade moisture management system.
Connection of the vertical drainage planes on the exterior of the perimeter wall systems to the drain tile system is important. Any restriction of moisture flow at this point may cause water pressure build up. This transition from vertical to horizontal is accomplished in a number of ways. The two most common are:
Building professionals have been engaged in a long, ongoing struggle over two concepts: drainage vs. waterproofing and venting vs. sealing. Is it better to seal water out with waterproofing or drain it away? Should contaminated air be vented out or sealed out? It is only by combing waterproofing with drainage and venting with sealing that we truly have an acceptable solution to each question.
For many years manufacturers of waterproofing and sealant materials have controlled the market. They had the marketing dollars to influence the consumer, so they have held sway. There have been few manufacturers with either the money or a reason to dispute the efforts of the waterproofing and sealant manufacturers to push product.
As a result of this imbalance of forces, waterproofing and sealant companies have won the day and instilled a sense of security with many building professionals. In many cases this sense of security is well-founded as many sealants and waterproofing products of today are nothing short of fantastic.
However, there is a caveat: While these materials have improved, the labor force that installs them has not. If we can accept, for the purpose of this discussion, that the labor force has declined, we must find a way to counteract it. That counteracting force is the inclusion of sound, proven drainage and venting practices.
Another negative force that must be addressed is construction design detail conflicts. Sometimes, drainage and venting are in direct design conflicts with waterproofing and sealing. Construction details that have high quality drainage, waterproofing, venting and sealing components perform better and last longer than details that don’t have all four.
So how does this pertain to below-grade construction? One primary example is a construction detail where the basement floor comes in contact with the exterior perimeter wall and the footing that supports it. (See Image #7.)
There are a number of moisture management concerns that need to be addressed at the intersection of the basement wall, structural footing and basement floor.
The voids that remain between the surfaces of these three construction details also represent entrance paths for both air and water. What seems like the obvious remedy (caulk and seal these voids off) may not be the best long-term moisture management solution. Placing a bead of caulk over the void in the corner where the floor meets the wall is, in fact, a very poor caulk detail; it is a three-sided adhesion issue that has been historically proven to have a short life.
A final issue with this detail is what happens if the interior surface of the basement wall gets wet from condensation or a leak? Where will the water go when it runs down the face of the wall and meets the floor? This is an example of the design conflict we mentioned earlier: sealing and waterproofing versus venting and drainage.
Building professionals and building code tend to lean towards waterproofing and sealing alone. However, venting and drainage play a critical role in a total solution, and they should not be omitted if a long term, low (or no) maintenance outcome is desired. If the drainage material and the moisture management system are of the right design, drainage, venting and temperature can be successfully addressed with one system. The bonus is that little or no maintenance will be required. (See Image #6.)
There is too much evidence that traditional moisture management practices are not working with 21st Century materials and the desired outcomes of sustainability and green building. It is time to embrace new ideas and employ better moisture management practices.
Moisture management of below-grade construction ‘basements’
The importance of moisture management in below-grade construction
By John Koester
Image 1
Building on a strong foundation has been a well-recognized principle of construction for thousands of years, but we still continue to violate the concept. One of the most violated areas of below-grade construction is the failure to include moisture management.Joseph Cubby says, “Learn the past. Decide the present. Build the future.” With apologies to Cubby, let us examine common below-grade construction moisture management errors from the past that are still in practice, and then make some decisions today on how to correct them so that we can build stronger foundations for tomorrow’s residential and commercial properties. Most residential and commercial structures feature below-grade construction that is usually 10- or 12-inch CMU or eight- or 12-inch poured concrete; a much smaller percentage involve ICF and wood walls.
The footings (or caissons) that support these walls can vary in depth and width depending on a variety of soil conditions. The basements may be fully below-grade or partially exposed (a berm) and there may be walkouts; many configurations are possible. However, they all have one thing in common – unique moisture management requirements. (See Image #1.)
The two most common sources of moisture that impact below-grade construction are infiltrating moisture (in liquid form entering through walls or floors) and condensing moisture (in vapor form being deposited on the interior surfaces of the basement walls and floors to create water droplets). Two very different concepts in the realm of the laws of physics, but in many cases, absolutely connected in the realm of wet and dry basements. The factor that joins them is temperature.
Moisture (water in the fill that surrounds below-grade construction) can impact this construction detail in many ways.
There are two that are most relevant to this discussion. First, moisture can pressurize against the surfaces of below-grade construction and force its way through voids in this construction detail creating “leaks.” Second, moisture, because of its molecular density, can transmit temperatures 25 times more efficiently than air to the exterior surface of the below-grade construction to potentially create a dew point temperature on the interior surface of the below-grade construction creating the possibility of condensation. (See Image #2.)

Image 2
It’s back to the old rules of moisture management: Keep moisture away from and off of construction details, and get it out of construction details as quickly as possible. If these two rules are adhered to, there will be less risk of moisture damage to the construction detail.
Learn From the Past
How do wet basements happen, and how can they be avoided? In some cases because of an insufficient budget, a wet basement is unavoidable. A cheap lot, poor soils with little or no drainage and the lack of resources to fund a high-quality drainage and waterproofing system can definitely lead to a “wet basement.” Sometimes, the best way to avoid a wet basement may be to not build one. Any and all conditions can be overcome, or at least greatly improved, but it won’t happen for free. So if the soil conditions of the lot you can afford are not appropriate for below-grade construction and the budget is tight, it is wise to choose another foundation option for your structure.A dry basement begins with a building site that can be managed to control moisture. The familiar phrase “high and dry” comes to mind when planning a foundation. In the nautical world, high and dry is a bad thing, but in the world of below-grade construction, it’s the pinnacle of moisture management perfection. When you get to start with a high-quality building site like the one above, a wet basement isn’t very likely! (See Image #3.)

Image 3
However, do not let looks deceive you. Once you have found an exceptional building site, be sure that the purchase agreement contains a contingency for a soils report generated by a licensed soils engineer. The information used to create this type of report comes from borings – cores of soil taken at varying depths in prescribed locations on the building site. Taking ownership of a building site that can’t be built on is a bad start. Finding out from the excavator that the soil conditions are bad and will require soil reconstruction and/or budget-busting oversized footings or pilings to support your structure, is also a bad start.
The soils report should also contain information such as the water table and the presence of any potential chemical contaminants. If there is any question about adjoining lots that may leech in contaminants, they should be tested, too. The structural engineer will take the information from the soils report and design the appropriate structural footing and walls that form the basement and support the structure. Once the site has met the critical tests, the next step in the process is jobsite moisture management during construction.
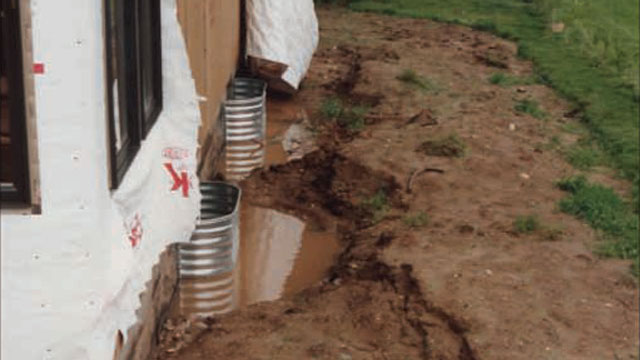
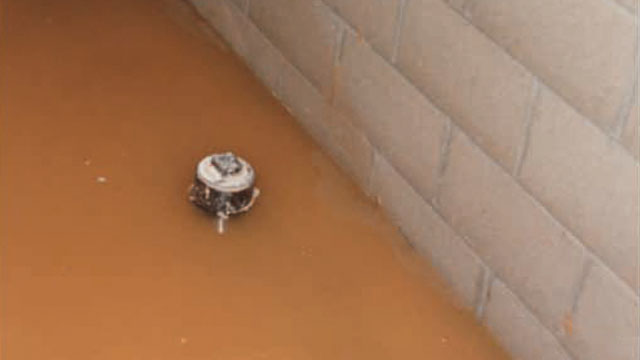
The below-grade construction phase of many building sites is negatively impacted by poor or nonexistent jobsite moisture management plans. A jobsite that is allowed to turn into a mud hole will have long-term negative impact on the soils that surround the below-grade construction and as a result, have a potentially negative impact on the moisture management of the below-grade construction. Jobsite moisture management, in the form of a jobsite drainage plan and the ongoing implementation of this plan, is critical. Allowing jobsite surface water to run toward and into below-grade construction excavation and details can have a permanent negative impact on project. The inadvertent saturation of soils that surround and support footings and walls is not good. (See Images #4A and #4B.)

Image 4A

Image 4B
The list of potential violators of a jobsite drainage plan is long and includes plumbers, sewer and water utility personnel, and electrical contractors. The standing jobsite rule on this should be that anyone who moves or adds fill to a jobsite should return it to the original jobsite elevation drawings and plans and compact fill as to the specs.
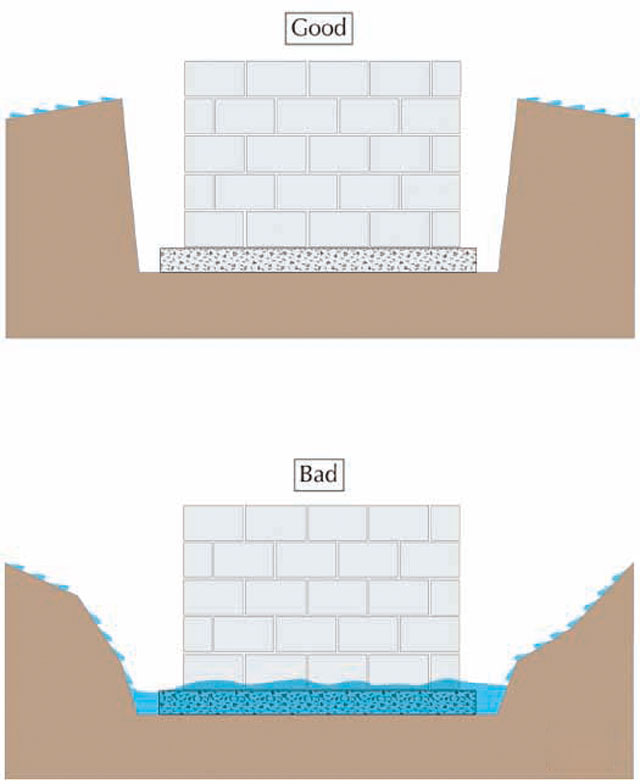
Construction specifications should clearly state excavation dimensions required to safely and efficiently construct the below-grade structure and minimize the size of open excavation, therefore, minimizing the amount of water entering the excavation. (See Image #5.)

Image 5
Upon completion of the excavation, form and pour the footings and walls, or form and pour the footings and lay the block. There are two critical principals that must be followed at this stage of the construction process. Firstly, “Do not fool around!” It is imperative that all parties involved adhere to a strict timeline and complete the project on schedule. The amount of excess time this excavation is left open invites moisture management disasters in the form of excavation cave-ins, flooded excavation, etc. Construct the basement and get it waterproofed, drained, and backfilled ASAP!
Secondly, “Don’t take shortcuts!” Do not skip any of the important construction procedures. The foundation of the entire project is literally being fabricated.
If any part of it is either hurried or omitted, the entire project is at risk. Working cohesively as a team is crucial. There are usually several subcontractors involved including plumbers, electricians, waterproofers and excavators. The coordination necessary to keep these subcontractors on schedule is also crucial.
Additionally, there is a real danger at this time that one or more subcontractors will, because of gross negligence, ignorance or other reasons, undo important drainage or waterproofing details. Studies have shown that as much as 85 percent of all labor time conducted on or near waterproofing systems is conducted by labor that has no understanding of how these systems are supposed to function.
Decide What Works: Key Plan Elements
Establishing a moisture-management plan results in a positive outcome for a below-grade construction project. Following these critical steps (the plan) leads to an optimal end product and good site-preservation practices.- Select a sound building site with good soil and good drainage. Finding the right location is the first step in the process. A location that is too low and soil that doesn’t drain invites moisture problems.
- Be sure construction details are structurally sound. Details, details, details; the right details make or break any construction project. It is imperative that all design details work together. A poorly designed detail can invite moisture into the project.
- The exterior surface of the basement walls and footing should be waterproofed. There are numerous high-quality waterproofing systems to choose from. Some of these systems consist of two parts. There are systems that feature a waterproofing material that faces the weather and is backed with a drainage material, and there are systems that are a sheet stock material with a pattern on the back that provides drainage. Both of these systems, when placed on the outside surface of the basement, provide waterproofing on the exterior surface and a predictable drainage plane behind it to move water from a high point to a low point.
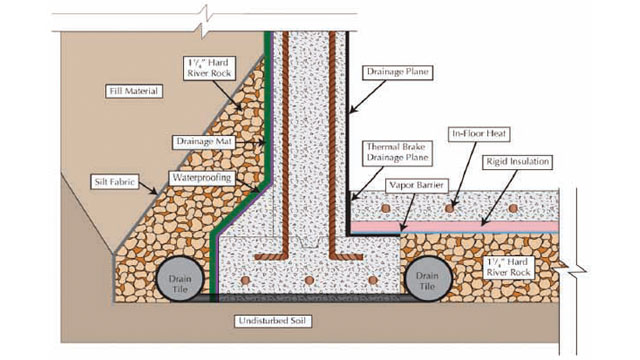
- Drainage systems should be located at the lowest elevation of the basement construction detail. This system usually incorporates drain tile and a sump basket system. Choose a high-quality rigid or flexible drain tile; the most common tile dimensions are four, six and eight inches. The drain tile should be installed along the interior and exterior sides of the exterior perimeter wall and footing with a connecting pipe of smaller dimension running through the footing at its base. (See Image #6.)

Image 6
Note: A structural engineer should do the required engineering to facilitate this detail. Connecting the exterior drain tile to the interior drain tile serves two important purposes. First, it provides a drainage pathway for water in an exterior drain tile of a full in-ground basement to have access to the sump pump and sump basket located in the interior of the basement. This facilitates it being pumped out and away from the basement detail. Second, it provides immediate elimination of potential water pressure build up. Prevention of this phenomenon is a must in maintaining a below-grade moisture management system.
Connection of the vertical drainage planes on the exterior of the perimeter wall systems to the drain tile system is important. Any restriction of moisture flow at this point may cause water pressure build up. This transition from vertical to horizontal is accomplished in a number of ways. The two most common are:
- Systems that actually have connecting components as part of the system (see Image #6)
- Systems with a drain field consisting of stone. (See Image #6.)
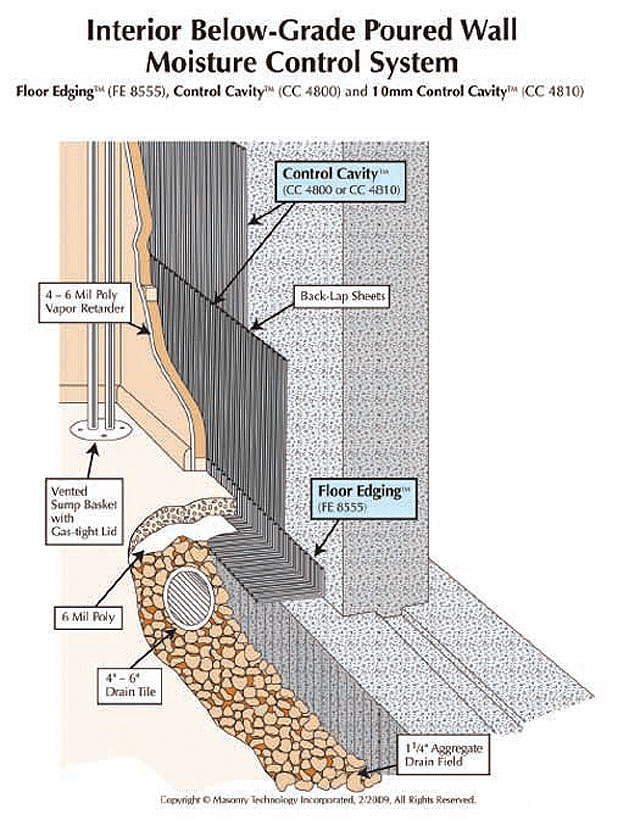
- Vertical wall drainage systems that are installed on the interior surface of exterior perimeter walls. The systems provide a passageway for moisture (in its liquid state) to drain from a high point of entry to a drain tile and drain field system at the lowest point of the construction detail. They maintain a separation (barrier) between concrete or CMU basement walls and the material used to create the finished interior wall detailing. (See Image #7.)
- Drain field systems that are installed below basement floors, around interior drain tile and around and over exterior tile and around and under sump baskets. When possible, these systems should be constructed out of hard river rock no smaller than 1.25 inches. (Never use sand or pea gravel.) The larger dimension hard rock creates more voids between each unit resulting in more space for water to occupy. The larger voids also create more space for air that in turn insulates the various basement construction details from the surrounding soil temperature and allows the internal man-made heat supply to keep these details warmer. (See Image #6.)
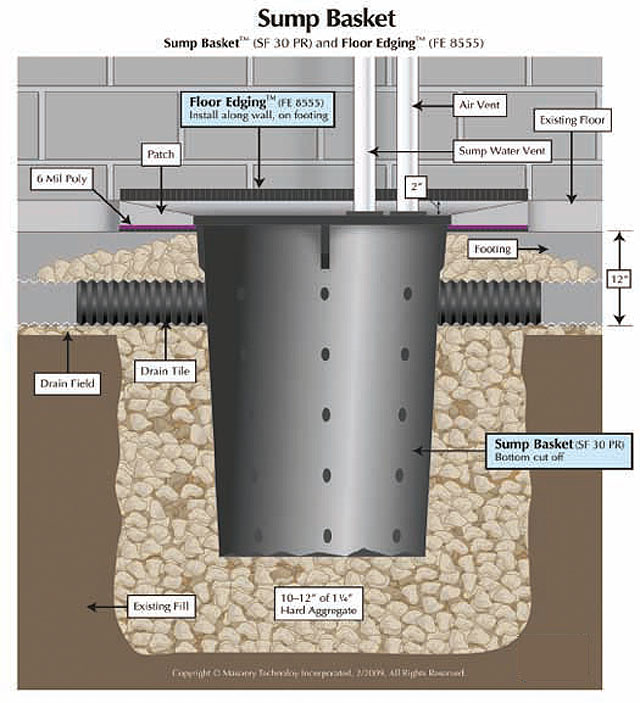
- The drain field sizing around and under the sump basket and the preparation of the sump basket is critical. The excavation around and under the sump basket should be oversized a minimum of 12 inches on all sides and at the bottom. This creates a larger capacity reservoir for water and as a result more productive pumping cycles for the sump pump. The sump basket must be a high quality, large capacity unit with a gas tight lid and well designed discharge ports. Before installation drill one-inch holes about two inches off center, starting eight inches down from the top of the sump basket on all sides and on the bottom of the sump basket. The oversized drain field surrounding the sump basket allows water that is held in the reservoir prior to the sump pump being activated by the float, to be readily available for the sump pump ensuring a productive pump cycle. A larger volume productive pump cycle reduces stress on the pump created by too frequent, low volume on and off cycles. The larger, deeper sump basket with the oversized drain field also creates a reservoir that can accommodate water surges. (See Image #8.)
- Employ a gas-tight sump basket lid with designated outlet hole gaskets and brackets that facilitates proper installation of moisture and gas venting stacks. This sump basket configuration can be mechanically vented with an inline fan system. The mechanically fastened sump basket lid is a safety device and code in most states. The venting of soil gases from the sump basket and the connecting drain tile/drain field details has a number of positive aspects. One of the most beneficial aspects is that the venting of these gases creates a slight negative pressure in these details that discourages soil gases from entering the living space of the building envelope.

Image 7
Building professionals have been engaged in a long, ongoing struggle over two concepts: drainage vs. waterproofing and venting vs. sealing. Is it better to seal water out with waterproofing or drain it away? Should contaminated air be vented out or sealed out? It is only by combing waterproofing with drainage and venting with sealing that we truly have an acceptable solution to each question.
For many years manufacturers of waterproofing and sealant materials have controlled the market. They had the marketing dollars to influence the consumer, so they have held sway. There have been few manufacturers with either the money or a reason to dispute the efforts of the waterproofing and sealant manufacturers to push product.
As a result of this imbalance of forces, waterproofing and sealant companies have won the day and instilled a sense of security with many building professionals. In many cases this sense of security is well-founded as many sealants and waterproofing products of today are nothing short of fantastic.
However, there is a caveat: While these materials have improved, the labor force that installs them has not. If we can accept, for the purpose of this discussion, that the labor force has declined, we must find a way to counteract it. That counteracting force is the inclusion of sound, proven drainage and venting practices.
Another negative force that must be addressed is construction design detail conflicts. Sometimes, drainage and venting are in direct design conflicts with waterproofing and sealing. Construction details that have high quality drainage, waterproofing, venting and sealing components perform better and last longer than details that don’t have all four.
So how does this pertain to below-grade construction? One primary example is a construction detail where the basement floor comes in contact with the exterior perimeter wall and the footing that supports it. (See Image #7.)

Image 8
There are a number of moisture management concerns that need to be addressed at the intersection of the basement wall, structural footing and basement floor.
- Temperature transfer
- Condensation
- Water Infiltration
- Soil gas/contaminated air infiltration.
The voids that remain between the surfaces of these three construction details also represent entrance paths for both air and water. What seems like the obvious remedy (caulk and seal these voids off) may not be the best long-term moisture management solution. Placing a bead of caulk over the void in the corner where the floor meets the wall is, in fact, a very poor caulk detail; it is a three-sided adhesion issue that has been historically proven to have a short life.
A final issue with this detail is what happens if the interior surface of the basement wall gets wet from condensation or a leak? Where will the water go when it runs down the face of the wall and meets the floor? This is an example of the design conflict we mentioned earlier: sealing and waterproofing versus venting and drainage.
Building professionals and building code tend to lean towards waterproofing and sealing alone. However, venting and drainage play a critical role in a total solution, and they should not be omitted if a long term, low (or no) maintenance outcome is desired. If the drainage material and the moisture management system are of the right design, drainage, venting and temperature can be successfully addressed with one system. The bonus is that little or no maintenance will be required. (See Image #6.)
- Separate above-grade and below-grade construction details. There is one last aspect of below-grade moisture management that should be considered in a holistic building design but rarely is. The interior living space above below grade construction needs very special heating an air conditioning considerations. The normal whole-house air circulation concept is not conducive for below-grade air management. Below-grade construction and above-grade construction (specifically the interior living space) are very different. Most below-grade construction (basements) needs to be dehumidified and warmed. The concept of heating and dehumidifying the basement is hard for most building owners to understand. Above-grade construction and below-grade construction need to be addressed by construction details that separate them.
Build For the Future
Those are the key elements of our 21st Century moisture management plan. Most of us know change is needed. Too many of us have witnessed too many below-grade construction failures due to moisture issues. The great Spanish philosopher, George Santayana wrote, “Those who cannot remember the past are condemned to repeat it.” How long will we accept and repeat below-grade construction practices that lead to failures.There is too much evidence that traditional moisture management practices are not working with 21st Century materials and the desired outcomes of sustainability and green building. It is time to embrace new ideas and employ better moisture management practices.
Originally published in Masonry magazine.
About the Author
John Koester is CEO Masonry Technology, Inc. He can be contacted at johnk@mtidry.com.
Copyright 2011 Masonry Technology Inc.


