April 13, 2011 8:00 AM CDT

The areas where two or more different construction products, details and systems intersect are always places of potential risk. Incompatibility of products or designs and poor communication between the various people involved (architects, contractors, tradespeople) are some of the more common scenarios that result in failures. In many cases the solution to the “leaky, drafty window” problem is to focus on the materials and methods used around the window rough opening.
Exterior building envelope construction systems (roofs and walls) often fail in the detailing of openings, projections and transitions. The detailing process is complicated because it involves more than a single individual or discipline. The challenge is managing the various disciplines using a wide range of materials into a cohesive unit. The need for holistic building is imperative. Each party involved needs to know how their task, and materials used to complete that task, impact the final result. This may sound impossible, but it’s not. It may be difficult, but it can be accomplished, and if the parties involved in the construction process are truly committed to sustainable building, it must be accomplished!
Start by understanding that perfection is the ultimate goal. The reality of imperfection is the risk of some type of failure. The real task is to modify risk in order to minimize failure. The first and most important task of moisture management, as it relates to construction products and details, is keeping moisture off of them. If water can’t get to the detail, it can’t damage it. The second task is to isolate as many details as possible. Identify risk zones and design details and concentrate on their intrinsic weaknesses. Once identified create a moisture solution. When a potential problem isn’t addressed in one area, it often leads to failure in another. A poorly prepared rough opening develops leaks that then get blamed on the window. In reality had the window detail been properly addressed in the first place, a failure in an adjacent detail may not have happened. Many wall failures, both structural and veneer-related, are a result of a moisture management failure on a window installation (specifically, problems with preparation of the rough opening).
Any and all liquid that gets into the window’s rough opening will accumulate at the bottom of the window rough opening. The accumulation of moisture at a low point in a window rough opening leads to absorption and migration into the surrounding details resulting in one of the most common failure scenarios in the construction industry. Cover the construction details that you don’t want to get wet with moisture-proof or moisture-resistant materials. Moisture should also be diverted away from construction details with drainage products as quickly as possible to minimize risk. The combination of a well-designed drainage system and a moisture-resistant or waterproofing system is the ultimate detail to manage moisture!
This historical idea of diverting moisture away from sensitive details with architectural details can be applied today, but with a twist. A thin veneer with a predictable rain screen drainage plane affords an opportunity to apply this moisture diverter technology on the inside of the void of the rain screen drainage plane rather than by adding architectural details on the outside.
Here are two examples of this moisture diversion practice of creating a detail above the window to move moisture away from the top and out and around the sides, one from the past and MTI’s “inside the envelope” solution.
The next step involves moving water away from the top. Remember that moisture moves downward. If we follow the examples from history that created external details away from the top of windows and doors, much of the moisture problem can be eliminated from the window rough opening. The only difference is that the moisture diverting mechanism is inside the building envelope.
The voids at the top, sides, and bottom need to have predictable pathways to drain moisture that may enter these voids or that may condense in them. The voids also need to be insulated because they can allow air infiltration with negative results. The idea that moisture can’t get in, or that if the voids are filled with insulation there isn’t enough room for moisture, is just wishful thinking!

Materials, technology and methods are completely different than they were just a decade or two ago. Society’s needs have also changed and the push is on to be responsible, to limit our use of energy and to conserve other resources. We have the knowledge and the materials to conquer the “leaky, drafty window” problem. We just need to employ the will to get the job done!
To see a video of the installation process, click on http://www.youtube.com/watch?v=WtQDRiousYc.
Moisture Management in Window Rough Openings
Innovative systems eliminate moisture
By John Koester
Focus on the materials and methods used around the window rough opening.
The phrase “leaky, drafty windows” is common in the construction industry and, unfortunately, it seems too often true. However, the perception may not be the reality. There may be leaks and drafts in close proximity to the window, but the window units themselves may not have anything to do with the problem. In many cases it is the wall system that the window unit is installed in that may be the actual source of the leaks and drafts. We need to focus our attention on the rough opening to conquer some of the air and moisture problems blamed on windows. The areas where two or more different construction products, details and systems intersect are always places of potential risk. Incompatibility of products or designs and poor communication between the various people involved (architects, contractors, tradespeople) are some of the more common scenarios that result in failures. In many cases the solution to the “leaky, drafty window” problem is to focus on the materials and methods used around the window rough opening.
Exterior building envelope construction systems (roofs and walls) often fail in the detailing of openings, projections and transitions. The detailing process is complicated because it involves more than a single individual or discipline. The challenge is managing the various disciplines using a wide range of materials into a cohesive unit. The need for holistic building is imperative. Each party involved needs to know how their task, and materials used to complete that task, impact the final result. This may sound impossible, but it’s not. It may be difficult, but it can be accomplished, and if the parties involved in the construction process are truly committed to sustainable building, it must be accomplished!
Start by understanding that perfection is the ultimate goal. The reality of imperfection is the risk of some type of failure. The real task is to modify risk in order to minimize failure. The first and most important task of moisture management, as it relates to construction products and details, is keeping moisture off of them. If water can’t get to the detail, it can’t damage it. The second task is to isolate as many details as possible. Identify risk zones and design details and concentrate on their intrinsic weaknesses. Once identified create a moisture solution. When a potential problem isn’t addressed in one area, it often leads to failure in another. A poorly prepared rough opening develops leaks that then get blamed on the window. In reality had the window detail been properly addressed in the first place, a failure in an adjacent detail may not have happened. Many wall failures, both structural and veneer-related, are a result of a moisture management failure on a window installation (specifically, problems with preparation of the rough opening).
Moisture risk at the top of a window detail can come from a number of sources.
Risk Zones of a Window Rough Opening
Moisture risk at the top of a window detail can come from a number of sources.- Condensation or frost accumulation from warm, moist air coming in contact with dew point temperature in the air or on surfaces of the interior of the window rough opening and on the surfaces of the window unit
- Openings or voids in the waterproofing material at the top of the window (installation flange and flashings)
- Moisture that may have entered the wall system above the window and moved from the high point of entrance down to the top of the window detail with an open waterproofing system.
Any and all liquid that gets into the window’s rough opening will accumulate at the bottom of the window rough opening. The accumulation of moisture at a low point in a window rough opening leads to absorption and migration into the surrounding details resulting in one of the most common failure scenarios in the construction industry. Cover the construction details that you don’t want to get wet with moisture-proof or moisture-resistant materials. Moisture should also be diverted away from construction details with drainage products as quickly as possible to minimize risk. The combination of a well-designed drainage system and a moisture-resistant or waterproofing system is the ultimate detail to manage moisture!
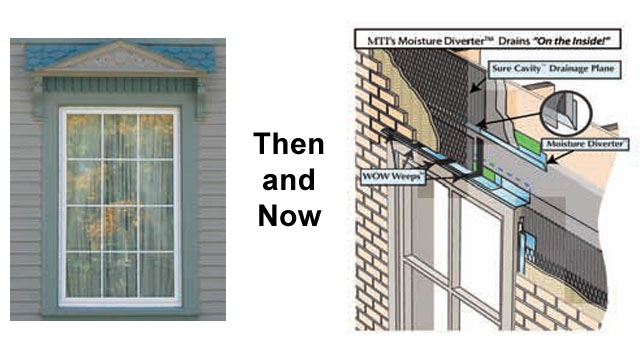
Diverting water away from window details is not a new idea nor is it a new technology.
Historical Basis for Moisture Diversion
Diverting water away from window details is not a new idea nor is it a new technology. Designing a pattern in the veneer immediately above a window has a long and successful history. What is not commonly known or understood in today’s construction and design industry is that most of the patterns in older historical building veneers were there to manage moisture and to move it off of, and away from, sensitive details such as windows and doors.This historical idea of diverting moisture away from sensitive details with architectural details can be applied today, but with a twist. A thin veneer with a predictable rain screen drainage plane affords an opportunity to apply this moisture diverter technology on the inside of the void of the rain screen drainage plane rather than by adding architectural details on the outside.
Here are two examples of this moisture diversion practice of creating a detail above the window to move moisture away from the top and out and around the sides, one from the past and MTI’s “inside the envelope” solution.
Rough Opening Moisture Management
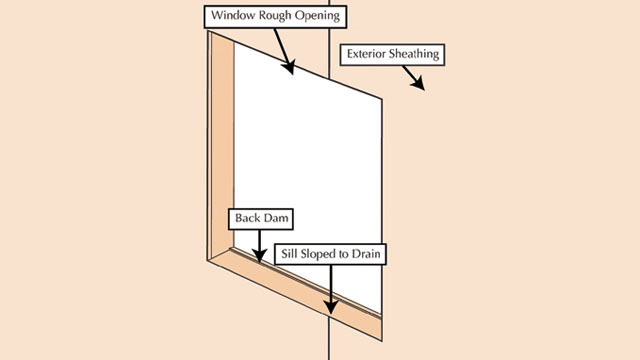
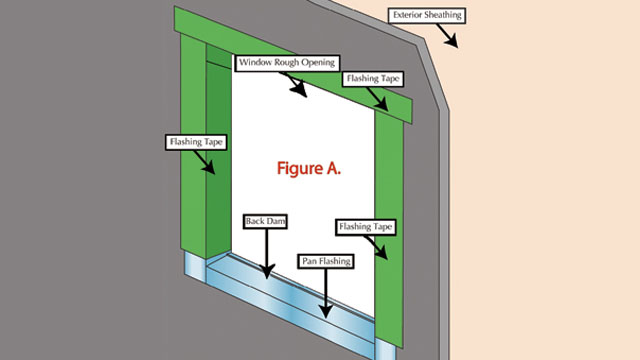
The bottoms of chases in framed construction window rough openings should be addressed with the following details and materials:Figure A
Figure A. Detail- The construction materials that make up the bottom of this detail must be covered with a waterproofing material that turns up the sides of the window rough opening a minimum of eight inches
- The top surface of the bottom of the window rough opening must be sloped to drain to the exterior of the building
- The back edge of the bottom of the window rough opening must have an elevation change that is higher and creates a back dam.
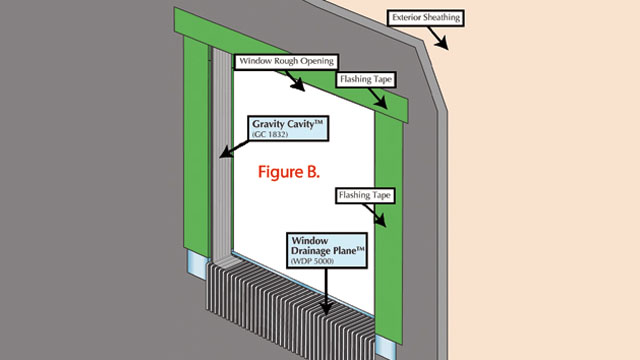
Figure B
Figure B. Detail- A pathway must be provided for moisture to move out of and off this detail. This needs to be done for moisture that may enter at the sides as well as at the bottom
- A pathway must be provided for moisture to exit the wall detail once it has drained out of the window rough opening. The Window Drainage Plane material will move water from the rough opening into the wall drainage plane (such as Gravity Cavity or Sure Cavity).
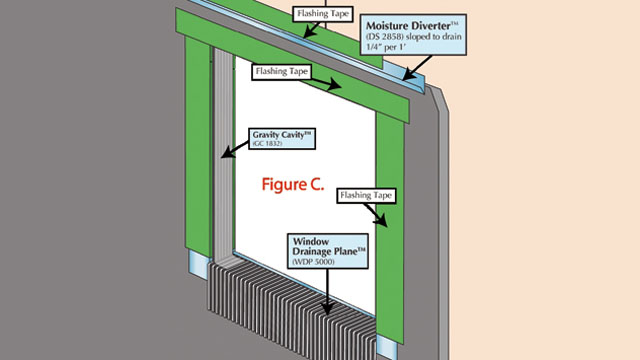
Figure C
Figure C. DetailThe next step involves moving water away from the top. Remember that moisture moves downward. If we follow the examples from history that created external details away from the top of windows and doors, much of the moisture problem can be eliminated from the window rough opening. The only difference is that the moisture diverting mechanism is inside the building envelope.
- A moisture diverter (such as MTI’s Moisture Diverter DS2858) is placed above the window rough opening. It should slope 1/4-inch per one foot and should extend at least four inches passed the side of the rough opening
- Apply Flashing Tape to the top edge of the Moisture Diverter. The layers of construction paper should overlap the top of the moisture diverter and extend down into the trough.
The voids at the top, sides, and bottom need to have predictable pathways to drain moisture that may enter these voids or that may condense in them. The voids also need to be insulated because they can allow air infiltration with negative results. The idea that moisture can’t get in, or that if the voids are filled with insulation there isn’t enough room for moisture, is just wishful thinking!
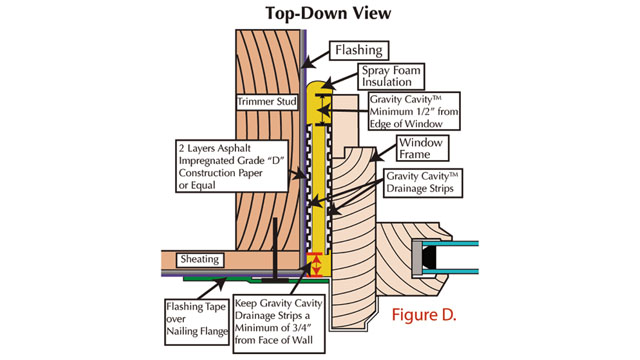
Figure D
Moisture Diverter provides drainage at the top of the window (see Figure C.). To provide drainage on the side, install Gravity Cavity strips on the sides of the rough opening (see Figure C.) and on the sides of the window frame. It is critical that these strips are centered on the sides of the rough opening and the sides of the window frame, and that the edges of the Gravity Cavity strips are at least 3/4-inch in from each edge of the rough opening (see Figure D.).Foam sprayed into opening at sides of window after Gravity Cavity strips have been installed on sides of RO and Window. There will be a minimum 1/2” gap from outside edge RO to edge of Gravity Cavity.
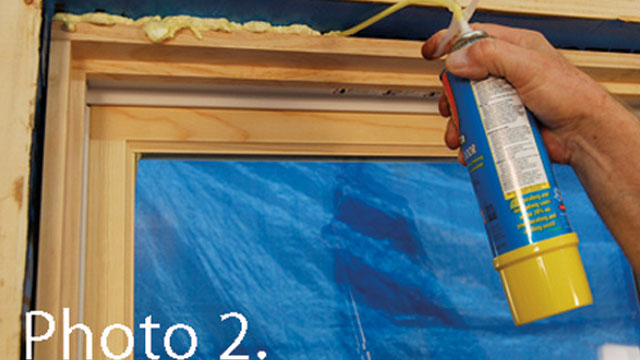
The MTI Moisture Diverter above the window provides drainage at the top, but the backside above the window still needs to be insulated with sprayed foam insulation.
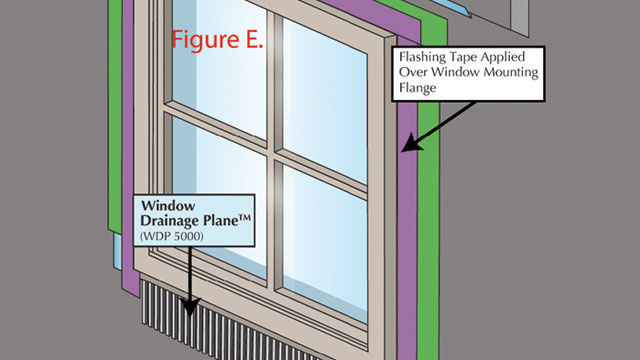
Insulate the top and sides of the rough opening with foam (Photos 1 and 2). The Gravity Cavity will provide the drainage required for the side voids of the rough opening; the Moisture Diverter will provide drainage for the the top. The foam insulation will seal off the sides and top of the detail.Figure E
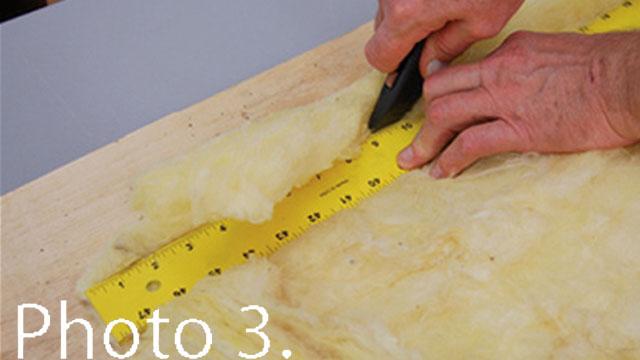
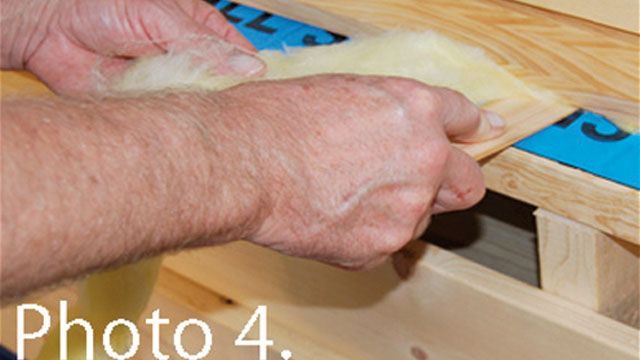
Use Window Drainage Plane for drainage at the bottom of the rough opening (see Figure E.). The Window Drainage Plane will also provide a pathway for moisture to enter the rainscreen drainage plane system.The bottom should be insulated with fiberglass batt insulation cut to size.
he addition of the insulation will seal off the bottom of the detail while still allowing drainage.
The bottom should be insulated with fiberglass batt insulation cut to size; the addition of the insulation will seal off the bottom of the detail while still allowing drainage (see Photos 3 and 4).Conclusion
Good construction design is identifying and prioritizing goals. (Do I want it strong? Do I want it lightweight? etc.) Sometimes the critical requirements of a construction detail or system infringe on long-held beliefs, and sometimes they seem to infringe on each other. Sometimes, they just seem like too much work. However, if our goal really is perfection, and if we really believe in sustainability and “going green,” we will seek what truly works.Materials, technology and methods are completely different than they were just a decade or two ago. Society’s needs have also changed and the push is on to be responsible, to limit our use of energy and to conserve other resources. We have the knowledge and the materials to conquer the “leaky, drafty window” problem. We just need to employ the will to get the job done!
To see a video of the installation process, click on http://www.youtube.com/watch?v=WtQDRiousYc.
Originally published in Masonry magazine.
About the Author
John Koester is CEO Masonry Technology, Inc. He can be contacted at johnk@mtidry.com.


