Amerimix
EZ Scaffold Corp.
EZG Manufacturing
Hydro Mobile, Inc.
Loot
Non-Stop Scaffolding
PROSOCO, Inc.
SOLA/Keson
SPEC MIX LLC
Stabila
Westlake Royal Stone Solutions
Find-a-Contractor Masonry Buyer's Guide
Traditional masonry sand is swept into the paver joints to fill the joints and secure the pavers into place
December 16, 2014 7:00 AM CST

Brick paver installation methods

Do it right

By

Brick, concrete, permeable, interlocking and stone pavers are popular paving options for exterior plazas, walkways, driveways and mass transit applications. These pavers are durable, offer many patterns and design options, are able to withstand vehicular traffic and maintain their integrity in demanding exterior freeze/thaw climates. For the purposes of this comparison, the most common type – brick paving – will be featured.

Brick pavers should be specified to perform in the intended application according to the following industry standards:

  • Pedestrian paving brick - meeting ASTM C 902 (pedestrian – minimum. 2 3/8 inches thickness)
  • Light traffic paving brick - meeting ASTM C902 (pedestrian and residential vehicular – minimum. 2 3/8 inches thickness)
  • Heavy vehicular paving brick - meeting ASTM C1272 (heavy commercial vehicular – minimum 3 1/8 inches thickness)
Weather classifications:
  • Class SX – exposed to water and freezing
  • Class MX – exposed to water but not freezing
  • Class NX – interior only
Traffic classifications:
  • Type I – for areas that expect extensive abrasion – sidewalks, driveways in public areas
  • Type II – for areas that expect intermediate pedestrian traffic – residential sidewalks and driveways
  • Type III – for areas that expect low pedestrian traffic – residential floors and patios
For more information on brick pavers and various setting methods, consult the Brick Industry Association, www.gobrick.com.

There are three basic types of setting options for these types of pavers in demanding traffic bearing applications:
  • Sand Set – Type F
  • Bitumen Set – Type R
  • Fixed Mortar Set – Type R
There are advantages and disadvantages to the three methods. A specifier will need to make an informed decision concerning the area of use and the amount of long-term maintenance that will be required for each of the systems. The following is a comparative analysis of the three methods:

Sand set installation

I. Sand Set Pavers

Sand set pavers have the lowest initial cost of the three options. The setting system can be altered, depending on the level of traffic that will be exposed to the installation system. The installation starts with grading and compacting the soil under the pavers. A geotextile drainage layer can be placed over the soil to help facilitate drainage. Next, a layer of aggregate (3/4-inch) is placed and compacted well over the soil (up to 95 percent of standard Proctor density as specified in ASTM D-698 or to ASTM D 1557 for areas subjected to vehicular traffic).

The aggregate layer is then “rough screeded” to get the level of this layer close to the design level. This layer can be adjusted, depending on how robust the setting system is intended to be. For example, heavy vehicular traffic will require eight to 12 inches of the aggregate base. Pedestrian traffic areas generally require four to six inches of the aggregate base. This base layer serves as the support for the sand set paving system.

In addition, the aggregate base facilitates water run-off and drainage. Next, the sand layer is used to bed the pavers. The sand layer (meeting ASTM C 33 or CSA A23.1 (coarse, clean masonry sand) can range in thickness from one- to two-inch thickness. The sand layer is placed compacted and screeded to the desired height. The pavers are then dropped into the sand layer. The pavers are tamped/compacted into place and finished to the desired height with a vibrating plate compactor capable of exerting 3,000 to 5,000 psi of centrifugal compactions force operating at 75 to 90 hertz. A plastic or rubber mat should be used on the compactor to avoid paver damage. Generally, at least two passes are made to seat the pavers.

Traditional masonry sand is swept into the paver joints to fill the joints. This process also helps to secure the pavers into place. The pavers are then compacted again until the joints are full. Polymeric sand can also be used for this process and is generally worth the cost upgrade. The polymeric sand will harden and set firm to a degree once it is exposed to moisture. The polymeric sand stands up better to point loads within the joints and resists “washout,” when compared to traditional sand swept joints.

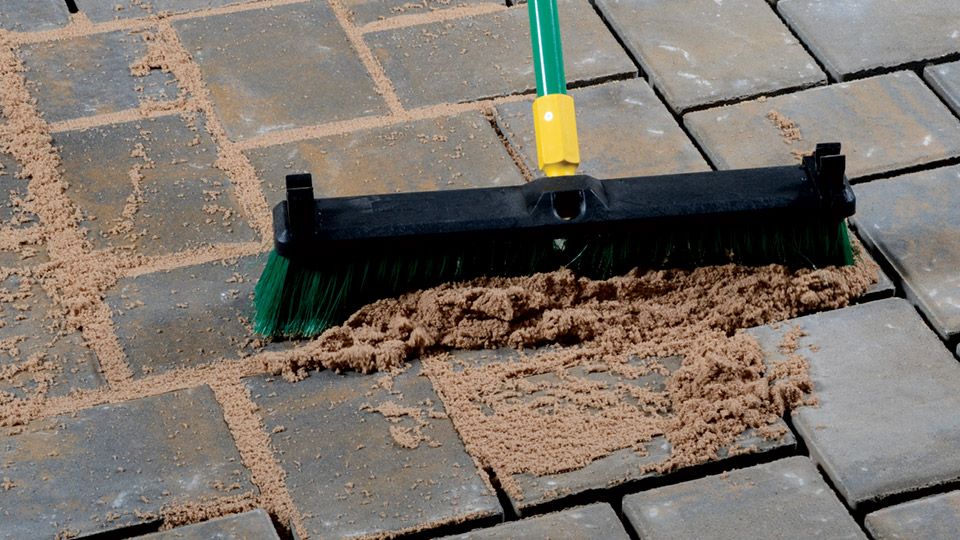
Figure 1: High-performance polymeric paving sand used in the joints of this installation; these paving sands come in various colors to compliment any architectural design.
Second generation/high-performance polymeric sands (see Figure 1) provide even superior performance and resist erosion and blow-out, and help prevent weed growth. In addition, these polymeric sands are permeable, allowing rainwater and oxygen to permeate.

Possibly the most critical issue with sand set pavers is the edge restraints. Edge restraints can range from typical paver edging strips and spikes to poured concrete curbs and sidewalks. Most sand set paver issues arise from the fact that the edge restraints are not designed to withstand the “pushing” and “movement” that traffic will place on the system. The edges can push out, which in turn causes the paving system to sink and start to experience issues with maintaining its designed level. It is to be expected that sand set pavers will require periodic ongoing maintenance to fix areas that have moved, dipped to vehicular patterns. Ongoing long-term maintenance costs should be factored into the life cycle analysis of sand set paving systems.

Advantages of sand set pavers:
  • Economical
  • Low initial installation cost
  • Designed to accommodate minor movement without failure
  • Easily repaired
  • User-friendly installation materials
  • No off-gassing of installation products
  • Easy access to repair underground utilities
  • Can be designed as a permeable pavement
Disadvantages of sand set pavers:
  • May require a thicker base for heavy duty applications
  • Edge restraints commonly experience problems with movement and “blowout”
  • Pavers can show traffic patterns
  • Tree roots can disturb installation
  • Drifting of pavers can occur
  • On-going maintenance is required
  • Traditional sand filled joints can experience erosion during periods of heavy rain and maintenance
  • Of the three systems, sand set pavers have the highest life cycle cost
  • No installation warranties apply
Bituminous installation

II. Bitumen Set Pavers

Bitumen set pavers are considered the middle ground as far as cost is concerned. A suitable concrete base or a three- to six-inch bituminous binder base placed over a compacted aggregate base (eight inches) is required for this installation system. Once the concrete base is poured and properly cured, a layer of ¾-inch asphaltic bitumen is placed over the slab followed by a 2 percent modified neoprene tack coat layer. This layer acts as an adhesive as the pavers are dropped into place. Once the pavers are set into place, the joints are filled in similar fashion to the sand set pavers with traditional masonry sand or polymeric sand.

For better and longer term joint performance, second generation/high performance polymeric sands can also be used with the bitumen installation method.

The bitumen layer is not considered a permanently fixed system in that the bitumen does allow some movement to take place. However, this method also requires good edge restraint to prevent paver separation and edge blow out. In addition, over time, vehicular traffic patterns can still reflect in the finish layer as the bitumen can experience long term fatigue.

Advantages of bitumen set pavers:
  • Mid-grade initial installation cost
  • Designed to accommodate minor movement
Disadvantages of bitumen set pavers:
  • Edge restraints commonly experience problems with movement and “blowout”
  • Pavers can show traffic patterns due to long term bitumen fatigue
  • Drifting of pavers can occur
  • Little tolerance for paver thickness variations
  • On-going maintenance is required
  • Traditional sand swept joints can experience erosion during periods of heavy rain or maintenance
  • Bitumen can give off a “petrol” odor
  • Bitumen is not considered to be an environmentally friendly product
  • Bitumen can off-gas (volatile organic compound)
  • Bitumen is not a user-friendly product (labor generally does not like this method)
  • No installation warranty in effect
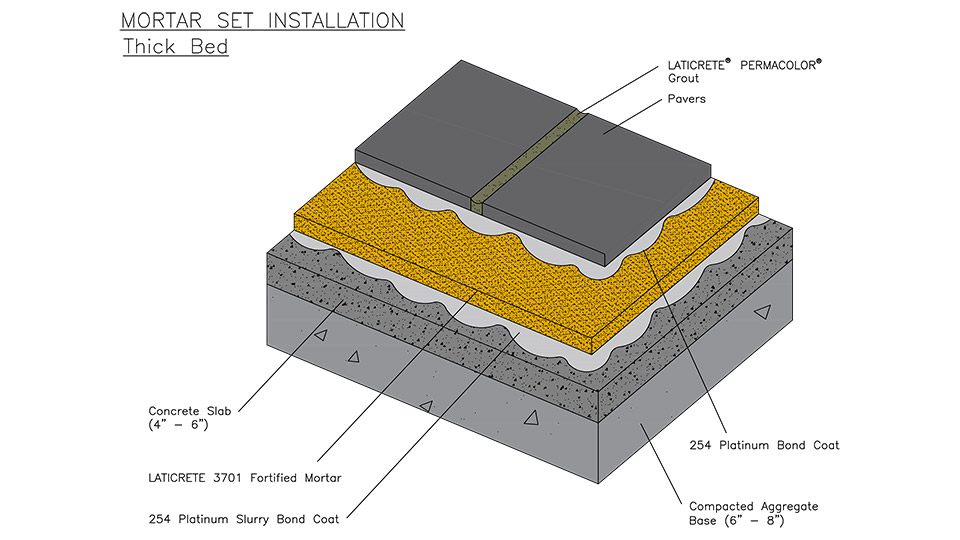
Mortar set installation - thick bed

III. Mortar Set Pavers

Of the three installation types, the mortar set system is considered to be the most permanent fixing system. The mortar set system typically requires a concrete base and aggregate drainage layer beneath the concrete slab. Once the concrete slab is in place and properly cured (e.g. 28 days at 70ºF), the mortar setting system can be placed. The thick bed methods (bonded or unbonded) or the bonded thin bed method can be used for this application.

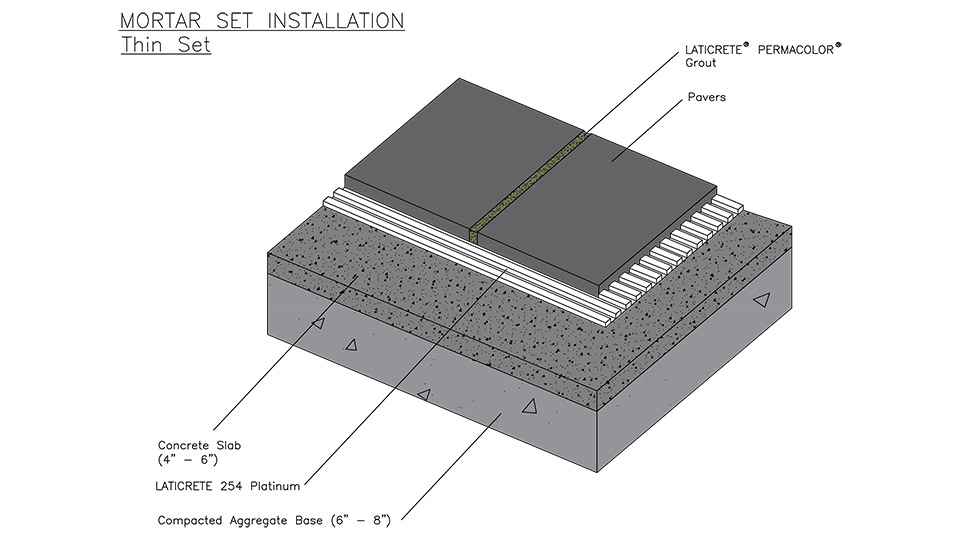
Mortar set installation - thin bed
Mortar set pavers are permanently fixed in place and require little long-term maintenance. Of the three paver setting methods, mortar set pavers have the lowest life cycle cost.

Advantages of mortar set pavers:
  • Low maintenance required
  • Low life-cycle cost
  • Resistant to point loading
  • Resistant to fatigue and reflecting traffic patterns
  • Resistant to edge blow out
  • User-friendly installation materials
  • Installation materials do not off gas
  • Long-term manufacturer performance warranties can apply
  • No weeds will grow in between the joints
  • Insects will not be able to disrupt the appearance of the paving system
Disadvantages of mortar set pavers:
  • High initial installation cost
  • Repairs are the most difficult and expensive
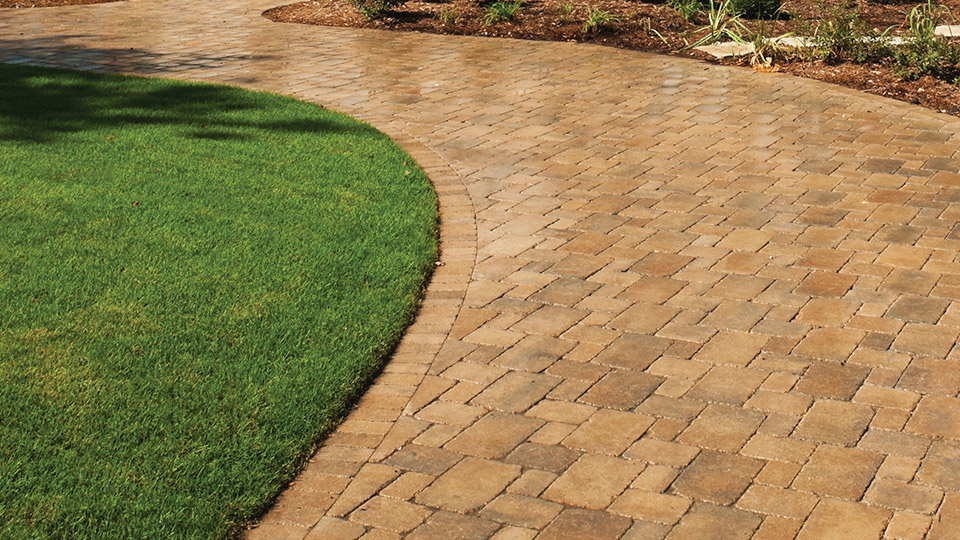
Figure 2: Exterior driveway/walkway treated with acrylic, scuff resistant coating; finishes typically come in natural or wet-look appearance (wet-look shown here).

Paver protection

Exterior pavers can be exposed to any number of potentials spills, oils, contaminants and other types of soiling as well exposure to impact and scuffing damage. To help protect the pavers from this potential damage, they can be sealed/treated with durable acrylic, scuff resistant coatings that provide a barrier against staining, damage from de-icing salts and abrasion (see Figure 2). The coatings come in a variety of finish types including brilliant high gloss, wet look finish, color enriching finish and no gloss finish type.

Some of these sealer types will deepen and enhance the inherent color of the paver, while drying to a clear finish that will not leave the surface slippery.

Brick and other types of masonry paving can add character and aesthetic sophistication to any space. The versatility of the modules, patterns, colors, textures and joint and paver finishes can create endless design options to fit any condition, use and customer taste. Proper installation and finishing techniques can result in durable long term performance and design for years.

Originally published in Masonry magazine.


About the Author

Arthur Mintie is director, technical services for LATICRETE International, Inc.


Related Articles

More Masonry Headlines

“The MCAA keeps my company competitive with other building materials.”

John Smith
John J. Smith Masonry Company
MCAA member since 1990

Learn More